
tsconfig.json 详解
文件选项
ts 文件有三种类型,分别是 ts ,d.ts ,tsx。
如果没有任何配置,ts 就会按照默认配置编译当前目录下得所有 ts 文件。
// tsconfig.json
{}
json运行以下命令,可以看到 ts 项目中所有 ts 文件都会被编译。
tsc
typescript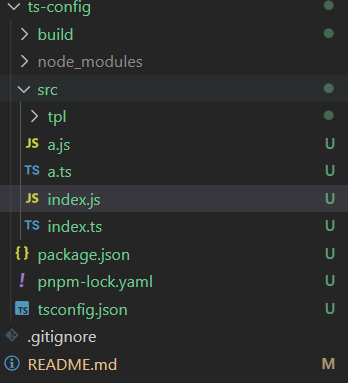
files
它是一个文件数组,表示编译器需要编译得单个文件列表。
{
"files": [
"src/a.ts"
]
}
json这样再次执行 tsc 就只会编译 a.ts 文件。
include
它也是一个数组,表示编译器需要编译的文件或者目录。
我们可以在 src 目录下新建 lib 目录,创建 lib.ts 文件。
// src/lib/lib.ts
let libs = {}
typescript{
"files": [
"src/a.ts"
],
"include": [
"src"
]
}
json如果 include 配置为 src,会编译所有文件,包括子目录文件。
include 支持通配符配置。
{
"files": [
"src/a.ts"
],
"include": [
"src/*"
]
}
jsonsrc/* 代表只会编译 src 目录下一级目录的文件。子目录不会被编译。
{
"files": [
"src/a.ts"
],
"include": [
"src/*/*"
]
}
jsonsrc/*/* 代表只会编译 src 目录下二级目录下的文件。
当前案例下会编译 lib 目录下所有文件以及 a.ts 文件, files 和 include 配置是会合并的。
exclude
表示编译器需要排除的的文件或者文件夹,默认 exclude 会排除 node_modules 目录下所有的文件。也会排除所有的声明文件。
{
"files": [
"src/a.ts"
],
"include": [
"src/*/*"
],
"exclude": [
"src/lib"
]
}
json上述配置,exclude 会覆盖 include 配置。也就是有 lib 目录不会被编译。
{
"files": [
"src/a.ts"
],
"include": [
"src"
],
"exclude": [
"src/lib"
]
}
json当前配置编译 src 目录下除 lib 目录的所有文件。
抽离复用
以上就是编译器管理文件的一些选项,此外配置文件之间是可以继承的,我们可以把基础的一些配置抽离出来方便复用。
新建 tsconfig.base.json 文件。
// tsconfig.base.json
{
"files": [
"src/a.ts"
],
"include": [
"src"
],
"exclude": [
"src/lib"
]
}
json// tsconfig.json
{
"extends": "./tsconfig.base"
}
json我们可以用 extends 继承基础配置,执行 tsc 是一样的效果。
其次在 tsconfig.json 文件中,我们也可以覆盖 tsconfig.base.json 文件中的配置。
// tsconfig.json
{
"extends": "./tsconfig.base",
"exclude": []
}
json这里指定不排除任何目录,这样编译器就会编译 src 目录下所有文件。
compileOnSave
它的作用是保存文件时编译器是否自动编译。不过 vscode 并不支持这个配置。你可以用其他编译器尝试使用一下。
// tsconfig.json
{
"extends": "./tsconfig.base",
"exclude": [],
"compileOnSave": true
}
json编译选项
本小节我们将学习跟编译相关的选项,这些选项有近 100 个,非常庞杂。我们仅介绍一些常用的选项,对于不常用的可以参考官方文档。
incremental
增量编译。ts 编译器可以在第一次编译后生成一个可以存储编译信息的文件,然后在二次编译时会对这个文件进行增量编译。这样可以提高编译速度。执行 tsc 命令会在根目录下生成 tsconfig.tsbuildinfo 文件。
我们可以设置 diagnostics 属性,通过这个可以看出两次编译时间的差距。
{
"compilerOptions": {
"incremental": true, // 增量编译
"diagnostics": true, // 打印诊断信息
}
}
json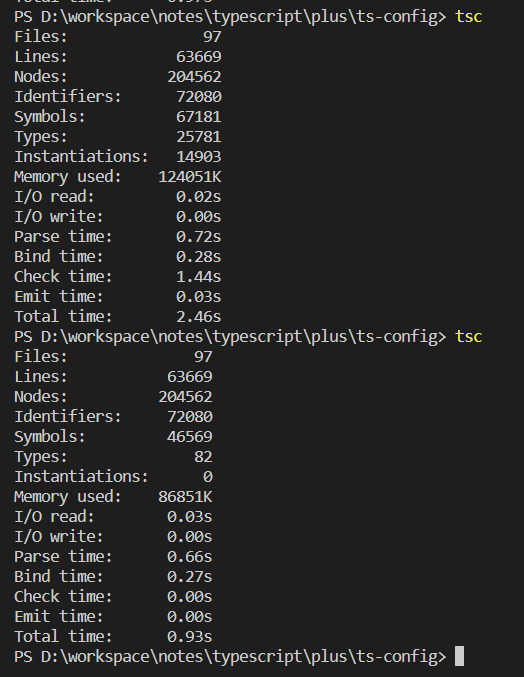
我们还可以通过 tsBuildInfoFile 配置增量编译文件的存储位置(路径、文件名称可以自定义)。
{
"compilerOptions": {
"incremental": true, // 增量编译
"tsBuildInfoFile": ".tsbuildinfo", // 增量编译文件的存储位置
"diagnostics": true, // 打印诊断信息
}
}
jsontarget/module
{
"compilerOptions": {
"target": "ES3", // 目标语言的版本
"module": "commonjs", // 生成代码的模块标准
}
}
jsonoutFile
{
"compilerOptions": {
"target": "ES3",
"module": "amd",
"outFile": "./app.js", // 将多个相互依赖的文件生成一个文件,可以用在 AMD 模块中
}
}
json我们定义一个 amd.ts 文件。
// src/amd.ts
let a = 1
export = a
typescript然后在 index.ts 中引入它。
// src/index.ts
import a = require('./amd')
typescript运行 tsc 命令会在根目录下生成 app.js 文件。会将 index.ts 和 amd.ts 这两个文件合并打包成一个文件。
// app.js
var s = 'a';
define("amd", ["require", "exports"], function (require, exports) {
"use strict";
var a = 1;
return a;
});
define("index", ["require", "exports"], function (require, exports) {
"use strict";
exports.__esModule = true;
(function () {
var hello = 'hello world';
document.querySelectorAll('.app')[0].innerHTML = hello;
})();
});
typescriptlib
{
"compilerOptions": {
"lib": [], // TS 需要引用的库声明文件,es5 默认 "dom", "es5", "scripthost"
}
}
json如果这个配置不指定,也会默认导入一些类库。当 target 为 es5 时,会默认导入 "dom","es5","scripthost" 。
如果我们要在程序中使用 ES 高级版本的特性,就需要用到这个属性。比如我们需要用到 es2019 的特性。
console.log([1, 2, [3, 4]].flat())
typescript{
"compilerOptions": {
"lib": ["dom", "es5", "scripthost", "ES2019.Array"],
}
}
jsonallowJs/checkJs
{
"compilerOptions": {
"allowJs": true, // 允许编译器编译 JS 文件(js、jsx)
"checkJs": true, // 允许在 JS 文件中报错,通常与 allowJs 一起使用
}
}
json再次执行 tsc 编译会有报错信息。
Cannot write file 'D:/workspace/notes/typescript/plus/ts-config/build/webpack.base.config.js' because it would overwrite input file.
# ...
shell这是因为 ts 编译器会尝试编译当前目录下的所有 js 文件。包括 webpack 的配置文件。我们需要排除它,只编译 src 目录下文件。
{
"include": ["src"], // 只编译 src 目录下的文件
"compilerOptions": {
"allowJs": true, // 允许编译器编译 JS 文件(js、jsx)
"checkJs": true, // 允许在 JS 文件中报错,通常与 allowJs 一起使用
}
}
json这样再次编译就不会有报错了。
outDir/rootDir
我们还可以指定输出目录。编译后的文件就会被打包到指定目录。
{
"include": ["src"], // 只编译 src 目录下的文件
"compilerOptions": {
"allowJs": true, // 允许编译器编译 JS 文件(js、jsx)
"checkJs": true, // 允许在 JS 文件中报错,通常与 allowJs 一起使用
"outDir": "./temp", // 指定输出目录
}
}
json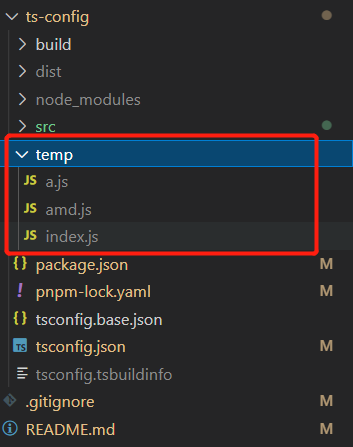
我们还可以定义 rootDir 指定输入文件目录,默认就是当前目录。
{
"include": ["src"], // 只编译 src 目录下的文件
"compilerOptions": {
"allowJs": true, // 允许编译器编译 JS 文件(js、jsx)
"checkJs": true, // 允许在 JS 文件中报错,通常与 allowJs 一起使用
"outDir": "./temp", // 指定输出目录
"rootDir": "./" , // 指定输入文件目录(用于输出)
}
}
json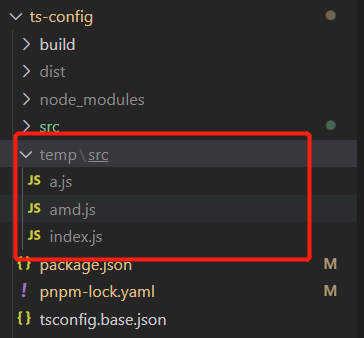
rootDir 指定的是当前目录,所以输出目录中就会包含 src 目录。如果我们把输入目录指定为 src。
{
"include": ["src"], // 只编译 src 目录下的文件
"compilerOptions": {
"allowJs": true, // 允许编译器编译 JS 文件(js、jsx)
"checkJs": true, // 允许在 JS 文件中报错,通常与 allowJs 一起使用
"outDir": "./temp", // 指定输出目录
"rootDir": "./src" , // 指定输入文件目录(用于输出)
}
}
json
从图中可以看到,输出的目录就不包含 src 目录。这个选项是用来控制输出目录结构的。
sourcemap
{
"compilerOptions": {
"sourceMap": true, // 生成目标文件的 sourceMap
}
}
json开启 sourceMap 会为我们自动生成 sourceMap 文件。
// amd.js.map
{"version":3,"file":"amd.js","sourceRoot":"","sources":["amd.ts"],"names":[],"mappings":";AAAA,IAAI,CAAC,GAAG,CAAC,CAAA;AAET,iBAAS,CAAC,CAAA"}
js我们还可以使用 inlineSourceMap。
{
"compilerOptions": {
// "sourceMap": true, // 生成目标文件的 sourceMap
"inlineSourceMap": true, // 生成目标文件的 inline sourceMap
}
}
json// a.js
var s = 'a';
//# sourceMappingURL=data:application/json;base64,eyJ2ZXJzaW9uIjozLCJmaWxlIjoiYS5qcyIsInNvdXJjZVJvb3QiOiIiLCJzb3VyY2VzIjpbImEudHMiXSwibmFtZXMiOltdLCJtYXBwaW5ncyI6IkFBQUEsSUFBSSxDQUFDLEdBQVcsR0FBRyxDQUFBIn0=
jsinlineSourceMap 会包含在生成的 js 文件中。
声明文件
{
"compilerOptions": {
"declaration": true, // 生成声明文件
}
}
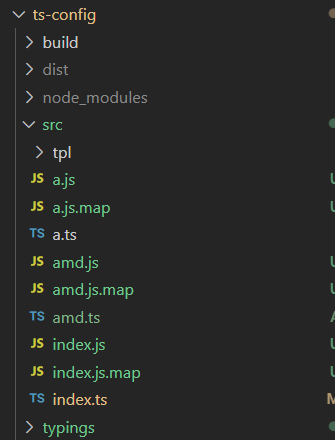
json如果我们配置 declaration,当编译时会自动生成声明文件(默认情况下与文件同级)。
我们还可以控制声明文件路径。
{
"compilerOptions": {
"declaration": true, // 生成声明文件
"declarationDir": "./typings", // 声明文件路径
}
}
json这样声明文件就会输出到 typings 目录下。但是这样会存在一个问题,ts 编译器也会执行编译,生成 js 文件。
我们可以告知 ts 编译器只生成声明文件,而不进行文件编译。
{
"compilerOptions": {
"declaration": true, // 生成声明文件
"declarationDir": "./typings", // 声明文件路径
"emitDeclarationOnly": true, // 只生成声明文件
}
}
json我们还可以为声明文件生成 sourceMap。
{
"compilerOptions": {
"declaration": true, // 生成声明文件
"declarationDir": "./typings", // 声明文件路径
"emitDeclarationOnly": true, // 只生成声明文件
"declarationMap": true, // 生成声明文件的 sourceMap
}
}
json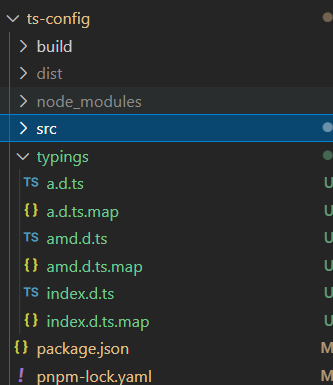
// a.d.ts.map
{"version":3,"file":"a.d.ts","sourceRoot":"","sources":["../src/a.ts"],"names":[],"mappings":"AAAA,QAAA,IAAI,CAAC,EAAE,MAAY,CAAA"}
js下面我们再来看下另外两个配置项。
{
"compilerOptions": {
"typeRoots": [], // 声明文件目录,默认查找 node_modules/@types
"types": [] , // 声明文件包,指定需要加载的声明文件的包,会在 @types 目录下查找
}
}
json对于 types 配置,如果我们指定某一个包,ts 只会加载这个包的声明文件。
removeComments
{
"compilerOptions": {
"removeComments": true, // 删除注释
}
}
jsonnoEmit/noEmitOnError
{
"compilerOptions": {
"noEmit": true, // 不输出文件
}
}
jsonnoEmit 不输出任何文件,也就是不做任何事。还有一个类似的选项。
{
"compilerOptions": {
// "noEmit": true, // 不输出文件
"noEmitOnError": true, // 发生错误时不输出文件
}
}
jsonhelpers
我们先来看一下 noEmitHelpers 。
{
"compilerOptions": {
"noEmitHelpers": true, // 不生成 helper 函数,需要额外安装 ts-helpers
}
}
json这个选项会涉及一个类的继承。
// src/index.ts
class A {}
class B extends A {}
typescript我们先来看一下没有配置 noEmitHelpers 的编译后文件。
"use strict";
var __extends = (this && this.__extends) || (function () {
var extendStatics = function (d, b) {
extendStatics = Object.setPrototypeOf ||
({ __proto__: [] } instanceof Array && function (d, b) { d.__proto__ = b; }) ||
function (d, b) { for (var p in b) if (Object.prototype.hasOwnProperty.call(b, p)) d[p] = b[p]; };
return extendStatics(d, b);
};
return function (d, b) {
if (typeof b !== "function" && b !== null)
throw new TypeError("Class extends value " + String(b) + " is not a constructor or null");
extendStatics(d, b);
function __() { this.constructor = d; }
d.prototype = b === null ? Object.create(b) : (__.prototype = b.prototype, new __());
};
})();
exports.__esModule = true;
(function () {
var hello = 'hello world';
document.querySelectorAll('.app')[0].innerHTML = hello;
})();
var A = /** @class */ (function () {
function A() {
}
return A;
}());
var B = /** @class */ (function (_super) {
__extends(B, _super);
function B() {
return _super !== null && _super.apply(this, arguments) || this;
}
return B;
}(A));
js在编译结果中我们可以看到,除了我们的代码,还引入了其他的工具库函数。它会使我们编译后的代码体积增加。通过 noEmitHelpers 我们可以控制是否生成 helpers 函数。下面再来看一下配置 noEmitHelpers 编译后的文件。
"use strict";
exports.__esModule = true;
(function () {
var hello = 'hello world';
document.querySelectorAll('.app')[0].innerHTML = hello;
})();
var A = /** @class */ (function () {
function A() {
}
return A;
}());
var B = /** @class */ (function (_super) {
__extends(B, _super);
function B() {
return _super !== null && _super.apply(this, arguments) || this;
}
return B;
}(A));
js可以看到 helpers 函数已经没有了。但是代码中的 __extends 函数是未定义的,需要我们额外安装 ts-helpers。
之前的做法需要我们额外安装 ts-helpers ,现在 ts 为我们提供了另外一种方式去引入 helpers 函数。
{
"compilerOptions": {
"noEmitHelpers": true, // 不生成 helper 函数,需要额外安装 ts-helpers
"importHelpers": true, // 通过 tslib 引入 helper 函数,文件必须是模块
}
}
json我们可以通过 importHelpers 配置,使用 ts 内置的库把 helper 函数引入进来(文件必须是一个模块)。我们需要改造一下代码。
// src/index.ts
class A {}
class B extends A {}
export = B
typescript再次执行 tsc 编译代码。
"use strict";
var tslib_1 = require("tslib");
(function () {
var hello = 'hello world';
document.querySelectorAll('.app')[0].innerHTML = hello;
})();
var A = /** @class */ (function () {
function A() {
}
return A;
}());
var B = /** @class */ (function (_super) {
tslib_1.__extends(B, _super);
function B() {
return _super !== null && _super.apply(this, arguments) || this;
}
return B;
}(A));
module.exports = B;
js可以看到编译后的代码引入了 tslib 的库,lib 中就包含了一些 helper 函数。这样就可以减少打包后代码体积。
downlevelIteration
{
"compilerOptions": {
"downlevelIteration": true, // 降级遍历器的实现(es3/5)
}
}
json如果我们的目标语言是 es3 或者 es5,就会对遍历器有一个降级的实现。
// src/index.ts
const arr = [1, 2, 3]
const arr2 = [4, ...arr]
typescript期间可能会报错,请考虑升级 “tslib” 的版本。ts(2343)。我们可以手动安装 tslib 来解决它。
pnpm i tslib --save-dev
"use strict";
var tslib_1 = require("tslib");
(function () {
var hello = 'hello world';
document.querySelectorAll('.app')[0].innerHTML = hello;
})();
var A = /** @class */ (function () {
function A() {
}
return A;
}());
var B = /** @class */ (function (_super) {
tslib_1.__extends(B, _super);
function B() {
return _super !== null && _super.apply(this, arguments) || this;
}
return B;
}(A));
var arr = [1, 2, 3];
var arr2 = tslib_1.__spreadArray([4], tslib_1.__read(arr), false);
module.exports = B;
js类型检查
{
"compilerOptions": {
"strict": true, // 开启严格代码检查
// "alwaysStrict": false, // 在代码中注入 "use strict";
// "noImplicitAny": false, // 不允许隐式的 any 类型
// "strictNullChecks": false, // 不允许把 null、undefined 赋值给其他类型变量
// "strictFunctionTypes": false, // 不允许函数参数双向协变
// "strictPropertyInitialization": false, // 类的实例属性必须初始化
// "strictBindCallApply": false, // 严格的 bind/call/apply 检查
// "noImplicitThis": false, // 不允许 this 有隐式的 any 类型
}
}
json如果开启 strict,strict 下面所有注释掉的配置也会默认开启。
function add(x: number, y: number) {
return x + y
}
add.call(undefined, 1, 2)
add.call(undefined, 1, '2') // 类型“string”的参数不能赋给类型“number”的参数。
typescript上述代码如果在严格模式下,会报错,如果关闭 strictBindCallApply 。ts 就会放过类型检查。
class A {
a: number = 1
getA () {
return function() {
console.log(this.a) // "this" 隐式具有类型 "any",因为它没有类型注释。
}
}
}
const a = new A().getA()
a()
typescript上述代码说的就是 noImplicitThis ,这里的 this 在某些环境下可能是 undefined。比如运行上面代码就会报错。
函数相关
{
"compilerOptions": {
// "noUnusedLocals": true, // 检查只声明,未使用的局部变量
// "noUnusedParameters": true, // 检查只声明的函数参数
// "noFallthroughCasesInSwitch": true, // 防止 switch 语句贯穿
// "noImplicitReturns": true, // 每个分支都要有返回值
}
}
json上述的配置会为我们提示错误,但是不会阻碍编译。
switch 语句贯穿的意思就是就是:如果某一个分支没有 break 语句,下面的一系列语句都会依次执行。
模块相关
{
"compilerOptions": {
// "esModuleInterop": true, // 允许 export = 导出,由 import from 导入
// "allowUmdGlobalAccess": true, // 允许在模块中访问 UMD 全局变量
"moduleResolution": "Node", // 模块解析策略
}
}
json关于 moduleResolution ,ts 默认使用 node 解析策略。还有其他选项,例如 Classic ,Node16,NodeNext 等 。
classic 模块解析策略
用于 amd、system js、es2015 模块。
相对导入:
// /root/src/moduleA.ts
import { b } from './moduleB'
// 文件解析策略
// 1. /root/src/moduleB.ts
// 2. /root/src/moduleB.d.ts
typescript非相对导入:
// /root/src/moduleA.ts
import { b } from './moduleB'
// 文件解析策略
// 1. /root/src/node_modules/moduleB.ts
// 2. /root/src/node_modules/moduleB.d.ts
// 如果本地目录没有,会依次向上查找 ...
// 3. /root/node_modules/moduleB.ts
// 4. /root/node_modules/moduleB.d.ts
// 5. node_modules/moduleB.ts
// 6. node_modules/moduleB.d.ts
typescriptnode 模块解析策略
相对导入:
// /root/src/moduleA.ts
import { b } from './moduleB'
// 文件解析策略
// 1. /root/src/moduleB.ts
// 2. /root/src/moduleB.tsx
// 3. /root/src/moduleB.d.ts
// 4. /root/src/moduleB/package.json ("types" 属性,优先查找 "types" 属性,如果没有会查找 index)
// 5. /root/src/moduleB/index.ts
// 6. /root/src/moduleB/index.tsx
// 7. /root/src/moduleB/index.d.ts
typescript非相对导入:
// /root/src/moduleA.ts
import { b } from './moduleB'
// 文件解析策略
// 1. /root/src/moduleB.ts
// 2. /root/src/moduleB.tsx
// 3. /root/src/moduleB.d.ts
// 4. /root/src/moduleB/package.json
// 5. /root/src/moduleB/index.ts
// 6. /root/src/moduleB/index.tsx
// 7. /root/src/moduleB/index.d.ts
// 8. /root/moduleB.ts
// 9. /root/moduleB.tsx
// 10. /root/moduleB.d.ts
// 11. /root/moduleB/package.json
// 12. /root/moduleB/index.ts
// 13. /root/moduleB/index.tsx
// 14. /root/moduleB/index.d.ts
// 如果本地目录没有,会依次向上查找,直到根目录下的 node_modules
json下面我们再来看下其他配置。
{
"compilerOptions": {
"baseUrl": "./", // 解析非相对模块的基地址,默认是当前目录
// 路径映射(如果我们不想导入 jquery 的默认版本,而是当导入精简版本,就可以在这里指定)
"paths": {
"jquery": ["node_modules/jquery/dist/jquery.slim.min.js"]
},
"rootDirs": ["src", "temp"], // 将多个目录放到一个虚拟目录下,用于运行时
}
}
json这里的 rootDirs 和前面的 rootDir 完全是两个概念,它可以为多个目录建立一个虚拟目录。应用场景如下:
我们新建 temp 目录,用来存放构建之后的文件。
// temp/utils.ts
export const util = {}
typescript我们可以单独编译一下这个文件。
tsc .\temp\utils.ts -d # 编译文件并生成声明文件
shell下面我们把源文件删除。即 temp/utils.ts 文件。有些时候我们构件好一个类库后,就不会二次构建了。它会永远放到这个输出目录中。如果在其他位置想引用这个类库,我们可以这样做。
// src/index.ts
import { util } from './utils'
console.log(util)
typescript因为 index.ts 编译后也会输出到 temp 目录,所以我们要想编译后也可以引用 util 文件,可以假定当前就在 temp 目录。但是这样很明显是有问题的。找不到模块“./util”或其相应的类型声明。ts(2307) 。
这时我们就需要用到 rootDirs 配置。
{
"compilerOptions": {
"rootDirs": ["src", "temp"], // 将多个目录放到一个虚拟目录下,用于运行时
}
}
json这样编译后就会认为它们在一个目录下。这样我们就可以在 src 目录下直接使用 temp 中的 util。编译后引用路径也不会发生改变。
打印相关
{
"compilerOptions": {
"listEmittedFiles": true, // 打印输出文件
"listFiles": true, // 打印编译文件(包括引用的声明文件)
}
}
json可以在命令行打印相关信息。

总结
本小节我们介绍了很多编译配置项,不需要你全都记住,建议遵循这样的原则,遇到问题解决问题。
如果在开发中遇到不太清楚的报错,可以去配置中找一找,也许你的报错通过一个配置项就可以解决。同时你可以发现编码中不规范的地方。此外还有一些配置项没有说明,我们后面再来讲解。
工程引用
工程引用是 ts 3.0 引入的新特性。我们来看下具体的应用场景。
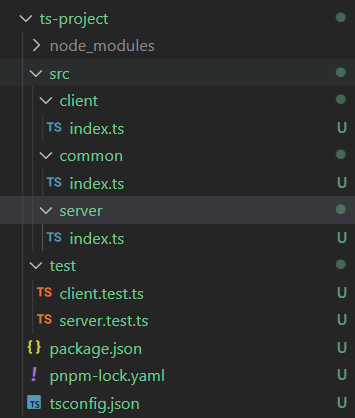
我们有一个项目,是一个前后端混合项目,并且有公共的引用文件,且服务端和客户端代码的测试用例都在一个目录中。
// src/common/index.ts
export function getTime() {
const time = new Date()
return `${time.getFullYear()}-${time.getMonth() + 1}-${time.getDate()}`
}
// src/client/index.ts
import { getTime } from '../common'
console.log(`Client Time: ${getTime()}`)
class Client {}
export = Client
// src/server/index.ts
import { getTime } from '../common'
console.log(`Server Time: ${getTime()}`)
class Server {}
export = Server
// test/client.test.ts
import Client = require('../src/client')
const c = new Client()
// test/server.test.ts
import Server = require('../src/server')
const c = new Server()
ts// tsconfig.json
{
"compilerOptions": {
"target": "ES5",
"module": "CommonJS",
"strict": true,
"outDir": "./dist"
}
}
json以上就是目前工程的所有代码。根据我们的配置,ts 编译器会将编译后的文件输出到 dist 目录,我们可以使用 tsc 命令执行构建。
编译后的文件目录如下。

我们并不希望构建后的目录有一个 src 层级,我们想把 client、common、server 直接构建到 dist 目录下。
我们可以在配置文件中加入 include 实现。
{
"compilerOptions": {
"target": "ES5",
"module": "CommonJS",
"strict": true,
"outDir": "./dist"
},
"include": ["src"]
}
json这样可以实现我们的目的,但是你会发现这样就把 test 目录给遗忘。还有一些不方便的地方就是,我们不能单独的构建客户端应用或者服务端应用。此外,我们也不想把测试用例构建到 dist 目录下。以上的问题都是通过单个配置文件不能解决的。工程引用就是用来解决这类问题的。它可以灵活控制输出目录,还可以使工程之间产生依赖关系,可以把一个大的项目拆分成小的项目,同时还可以利用增量编译提升编译速度。下面来看一下使用工程引用改造后的项目。
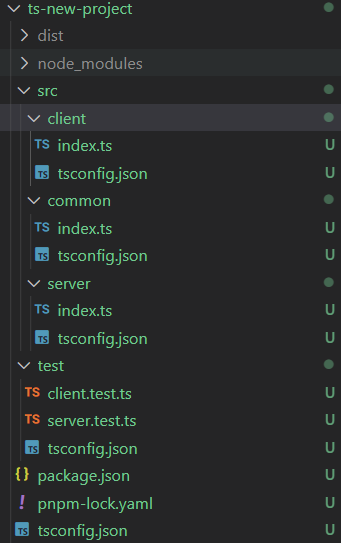
上述代码基本没有改动,只是我们为每个目录增加了自己的 tsconfig.json 文件。
// tsconfig.json
{
"compilerOptions": {
"target": "ES5",
"module": "CommonJS",
"strict": true,
"composite": true, // 工程可以被引用并且可以增量编译
"declaration": true, // 生成声明文件
},
}
// src/client/tsconfig.json
{
"extends": "../../tsconfig.json",
"compilerOptions": {
"outDir": "../../dist/client"
},
"references": [
{
"path": "../common"
}
]
}
// src/server/tsconfig.json
{
"extends": "../../tsconfig.json",
"compilerOptions": {
"outDir": "../../dist/server"
},
"references": [
{
"path": "../common"
}
]
}
// src/common/tsconfig.json
{
"extends": "../../tsconfig.json",
"compilerOptions": {
"outDir": "../../dist/common"
}
}
// test/tsconfig.json
{
"extends": "../tsconfig.json",
"references": [
{ "path": "../src/client" },
{ "path": "../src/server" }
]
}
jsonts 为了支持工程引用,为我们提供了一种新的构建模式。即 build 构建模式,它可以单独构建一个工程。相关的依赖也会被自动构建。
tsc -b src/server --verbose # 构建 server 工程
tsc -b src/client --verbose # 构建 client 工程
shell构建完毕后生成目录如下:
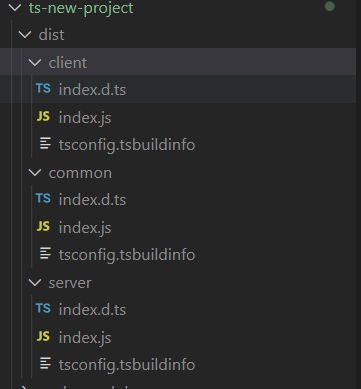
再次执行构建命令,你会发现构建速度也很快。因为我们启用了增量编译。
下面我们再来构建一下测试用例。
tsc -b test --verbose # 构建测试用例
shell你会发现 test 目录下会生成构建后的文件。

我们可以用以下命令清空构建文件。
tsc -b test --clean
shell从以上可以看出,工程引用的优点。首先它解决了输出目录结构的问题,其次它解决了单个工程构建的问题,然后它还可以通过增量编译提升构建速度。其实 typescript 项目本身已经使用工程引用改造过。
我们可以来看一下 typescript 工程 的 src 目录。当前目录下有一个基础配置,tsconfig-base.json 文件。
// src/tsconfig.json
{
"compilerOptions": {
"pretty": true,
"lib": ["es2015.iterable", "es2015.generator", "es5"],
"target": "es5",
"moduleResolution": "node",
"rootDir": ".",
"declaration": true,
"declarationMap": true,
"sourceMap": true,
"composite": true,
"noEmitOnError": true,
"strictNullChecks": true,
"noImplicitAny": true,
"noImplicitThis": true,
"strictPropertyInitialization": true,
"noUnusedLocals": true,
"noUnusedParameters": true,
"skipLibCheck": true,
"alwaysStrict": true,
"preserveConstEnums": true,
"newLine": "lf",
"types": []
}
}
json其他的文件夹都是一个子工程。以 tsc 目录为例。
// src/tsc/tsconfig.hson
{
"extends": "../tsconfig-noncomposite-base",
"compilerOptions": {
"outFile": "../../built/local/tsc.js"
},
"files": [
"tsc.ts"
],
"references": [
{ "path": "../compiler", "prepend": true },
{ "path": "../executeCommandLine", "prepend": true }
]
}
jsonts 官方配置是一个很好的参照,你可以自己去学习一下。看看它是怎么利用工程引用特性来支撑这样一个庞大项目的构建。
如何在根目录一次性构建所有工程?
可以在 src 下新建一个 tsconfig.json 文件,通过运行 tsc -b src 来一次性构建所有工程。
{
"files": [],
"include": [],
"references": [
{ "path": "./client" },
{ "path": "./common" },
{ "path": "./server" }
]
}
jsontsc -b src --verbose # 构建 src 目录下所有工程
shell